

How Do I Make a Cricut Design All One Color
To understand how to add color in Cricut Design Space, you also need to know how colors are used with your machine.
Linetype & Fill are located on the "Top Menu" of the canvas area, and, during the cutting process, they will tell your machine what action to perform.
Right now, there are seven actions Cut, Draw, Score, Engrave, Deboss, Wave, Perf. Keep in mind that depending on the machine you have selected on the top of the window (Maker or Explore), you will have different options.
However, as I just mentioned before, there are only three areas or settings we can use colors in Cricut Design Space.
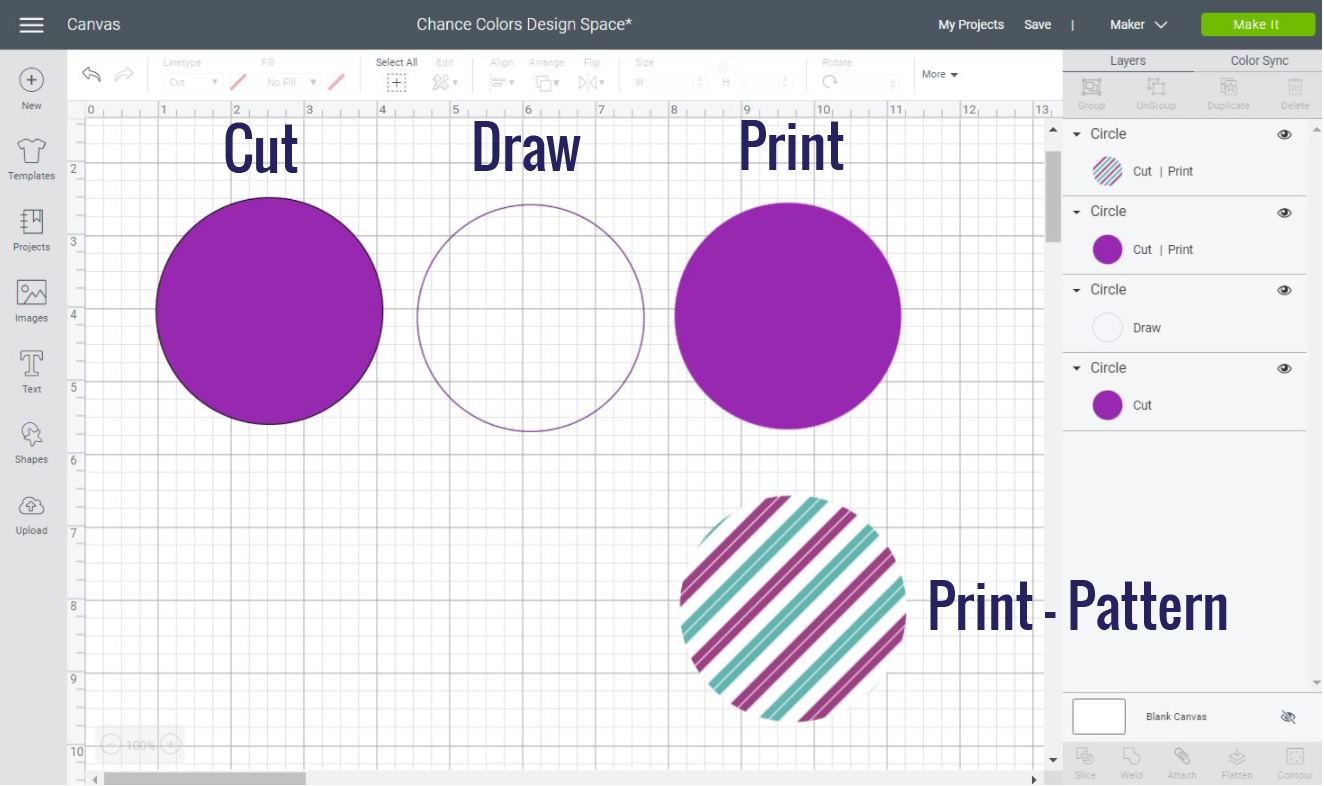
Check out the following chart, and let's have a better understanding of each way you can color in Design Space.
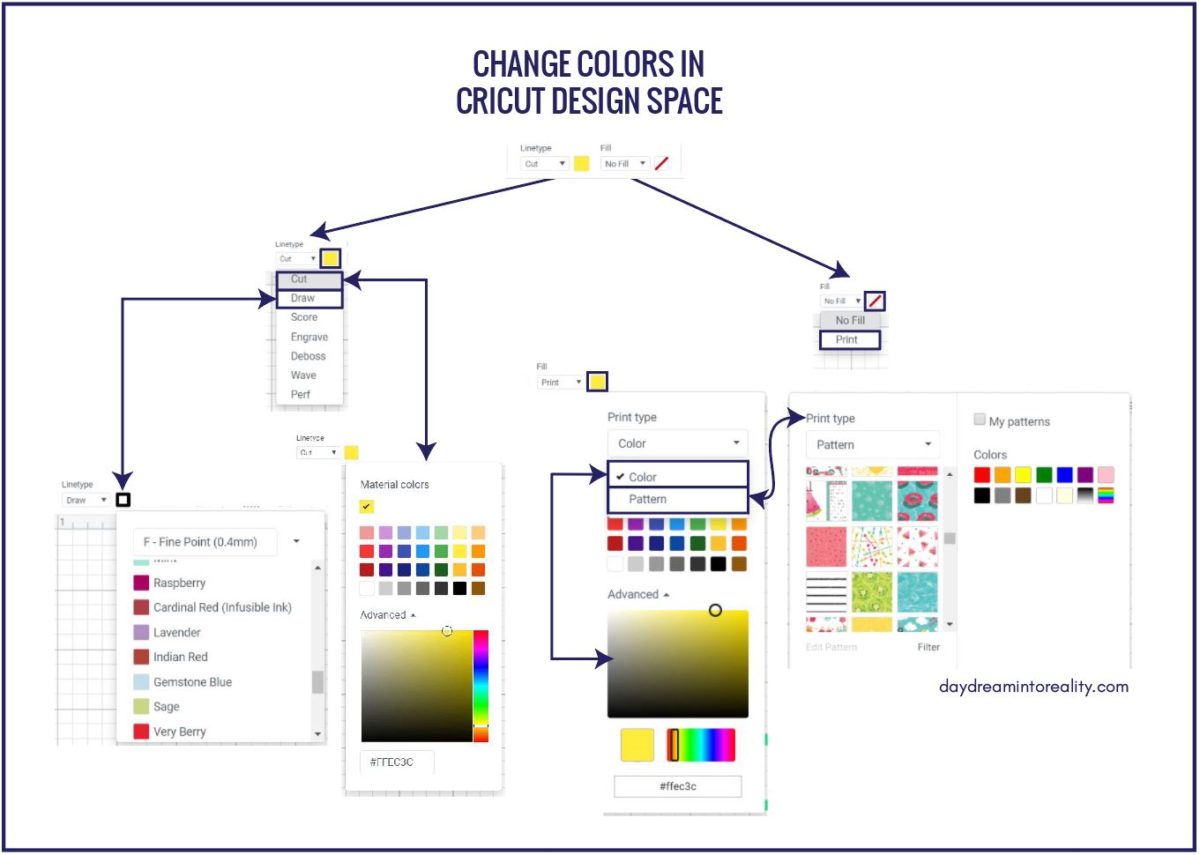
Change/Add colors with "Cut" as linetype
When a layer has "Cut" as linetype, every color represents a different material. These materials can be vinyl, paper, fabric; you name it.
Tip: If you are working on a design that has a single color, you don't have to change colors because everything is one single mat during the cutting process.
To change colors, add something to the canvas (image, text, shape), select it, and click on the little square next to linetype to pick your color.
There's also an advanced setting that will allow you to see more colors. You can even find them by hex code.
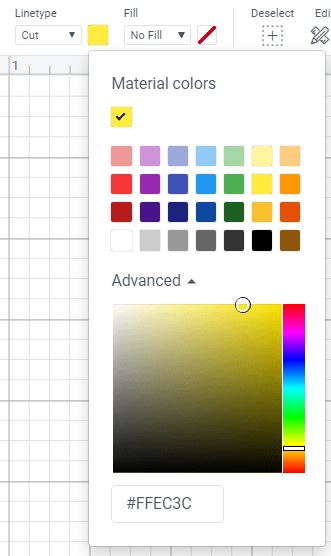
Change/Add colors with "Draw" as linetype
When a layer has "Draw" as linetype, you are telling your Cricut you want to use Cricut Pens.
You must understand that the pens are only going to outline your shape, text, image. Pens won't color your design.
Does it make sense?
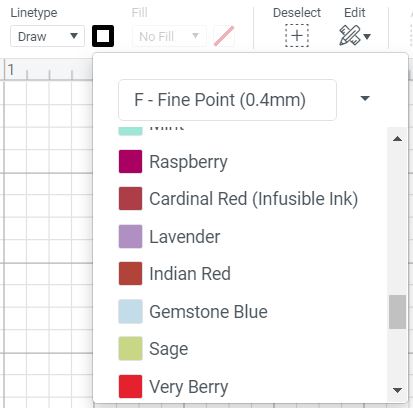
Note: There's an exception to this rule when you use writing fonts or designs in Cricut's library made for drawing purposes.To learn all about the Cricut Pens, make sure to read my step by step guide.
To change the colors if using Cricut Pens. First, select the design you want to use, then turn the linetype to "Draw" and, last but not least, change the color of the pen you want to use on the little square next to linetype.
If you are using just one color on your project, you can leave the default color alone. However, if you are using more than two colors on your project, you need to make the respective changes to your design.
Important:In most cases, when you are using Cricut Pens, you need to use the "Attach" tool to tell your machine where to write. I explain this concept better in my"How to weld, attach, & group in Cricut Design Space tutorial."
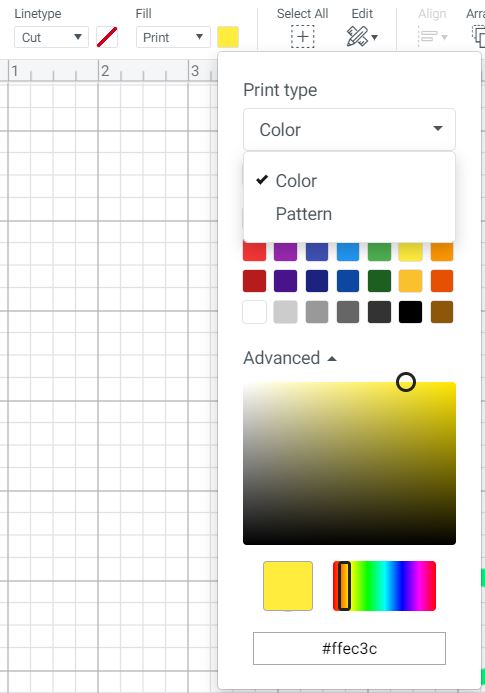
Change/Add colors with "Cut" as linetype and "Print" as a fill
The third and last way to add color in Cricut Design Space is when you have with "Cut" as linetype and "Print" as a fill, these two settings combined are also known asPrint then Cut.
Print then Cut is one of my favorite features the Cricut machine has. Some of the things you can make with this feature arestickers (read the tutorial) andgift tags (read the tutorial).
Unlike "Cut" and "Draw," when you are using "Cut" as linetype and "Print" as a fill, you canFILL in images with the colors you want to use.
When you use this feature, you are putting your printer to work, and your Cricut will cut the edges of your design.
In the previews ways to add color (Cut and Draw), I mentioned that changing colors wasn't always relevant, because the final color is given by the material you use or the pen you install in your machine.
Well…
That's not the case for Print then Cut designs. Before you send your project to your printer, you need to make sure to add the colors the way you want.
To add/change the color of a layer you want to Print then Cut, add your design to the canvas, select it set linetype as "Cut" and Fill to Print.
Something great about Print the Cut is that you can fill in (color) your images with patterns. Cricut has hundreds of them!(Patters are only available in Desktop computers, the app doesn't have them).
Print then Cut is a very robust setting, and I can't cover everything of it in this tutorial, so check out my helpful guide.
How do colors look like in Cricut Design Space?
At this point, you know the three different ways to add color in Cricut Design Space.
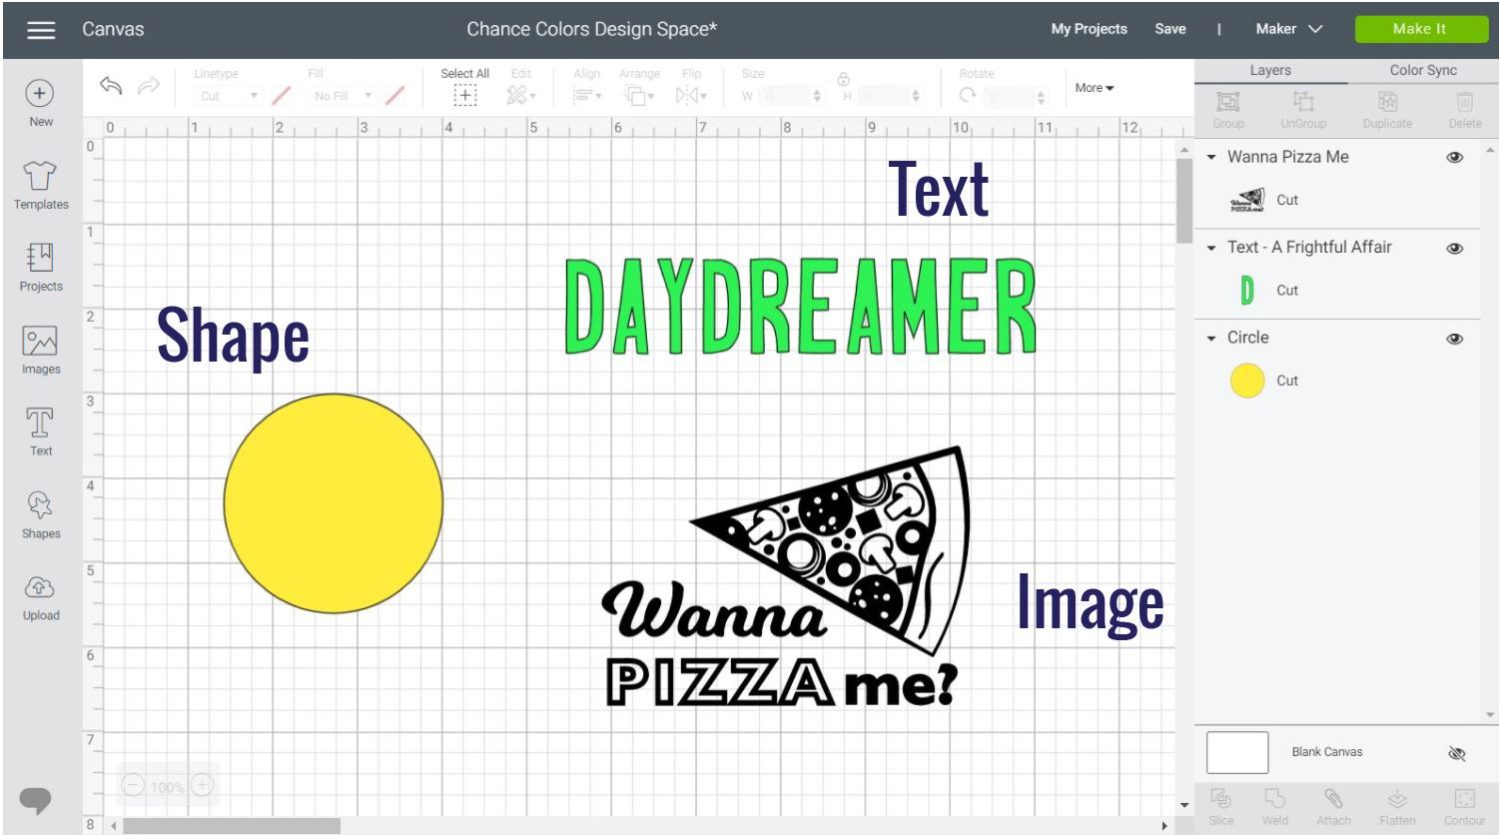
Here's a screenshot of how each option looks like in the canvas area.
Cut images have a thin grey outline (where the blade will cut through) around the shape or design, remember this color represents the materials you are cutting.
Draw layers are outlined; that outline is where the pen will go through. Remember, the Cricut doesn't color.
Print images have no outline; it's just the regular shape. The blade will cut through the edges of your design. Underneath the"Print then Cut" purple circle, there's another one, but it's filled with a pattern.
Here's how colors look in different types of layers (shape, text, single image).
How to Change Colors of a Multi-Layer Design
When you download an SVG file from the internet, or when you add an image from Cricut's library, you'll find that some designs have different colors.
Designs that have multiple colors are called multi-layer designs. Depending on the way you decide to add color (cut, draw, Print) this will represent materials, pens, or a print.
Usually, these types of images are organized and grouped when you add them to the canvas area; therefore, if you change the color right away, all the layers will have the same color.
Learn more about Grouping in Design Space
To fix this issue, select the multi-layer design and click on the ungroup option located on the top panel of the canvas area.

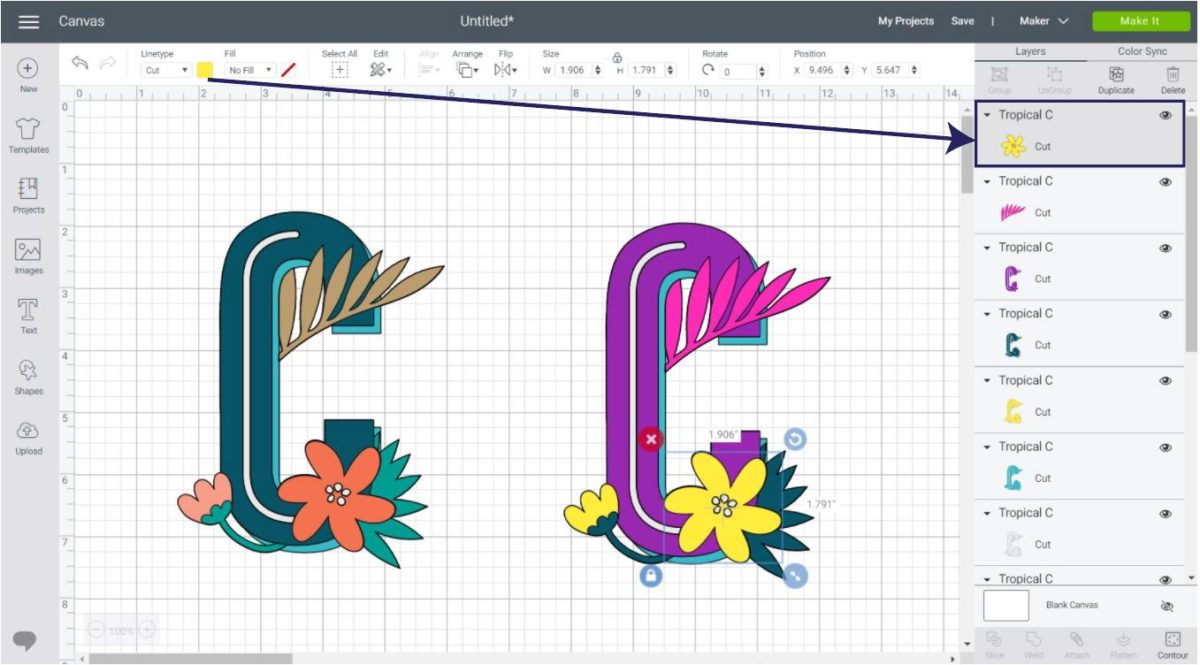
The best way to change the colors of each element is from the layers panel. Select the layer you want to change and click on the color square next to linetype (or fill for a print then cut).
How to Color images in Cricut Design Space (Fill in Images)
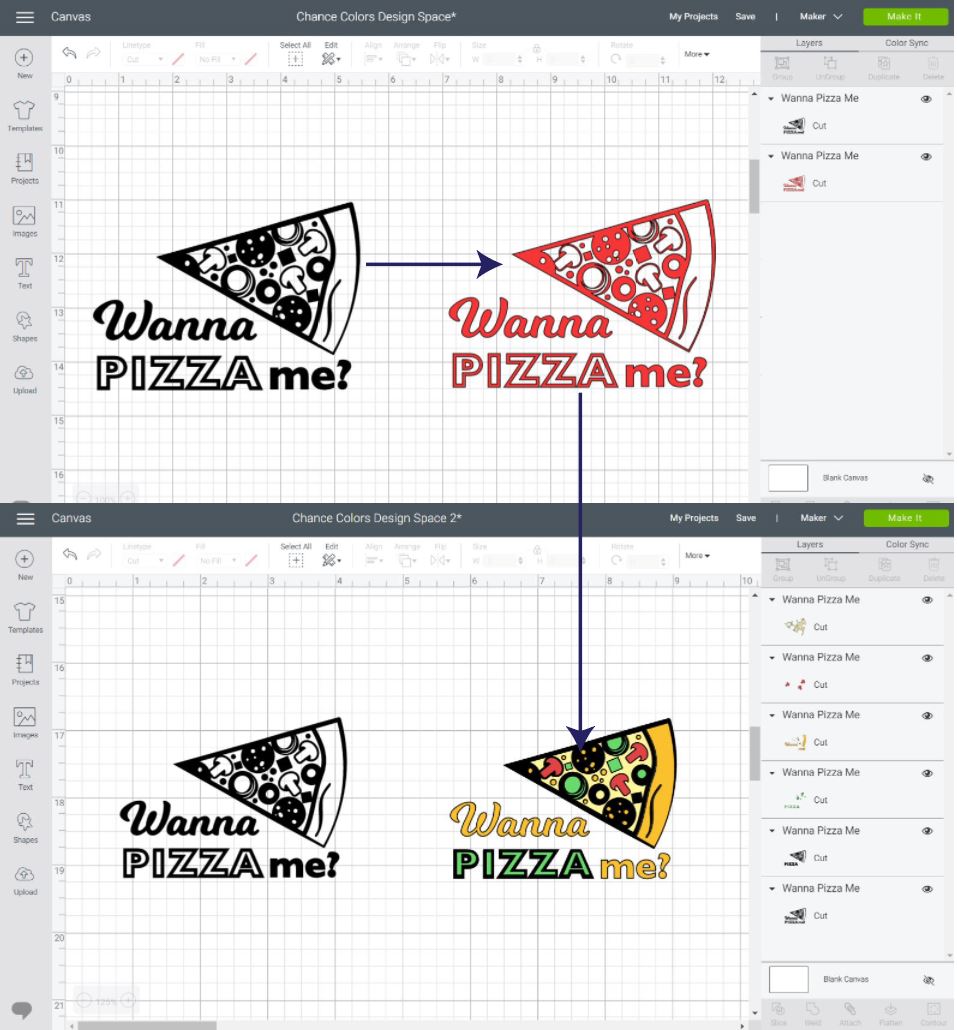
There's going to be a moment in time where you find an image that you love a lot, but it's on a single layer.
Note: If you want to follow along, the following image can be found in Cricut's library by the code MB30A0C5.
Look at the screenshot down below.
When you change the color of the pizza, all of the elements will change with it.
Also, if you look close enough, you'll see that there are some blank spaces inside the image where there's no color; this is how the image was designed, and if you want to have different colors, the usual way I just thought you wouldn't be enough.
No worries, though!
I am always trying to find ways to go around some of Cricut's software limitations, and if you want to color inside an image, there's a way to do so!
Don't forget that these colors will represent either a material, pen color, or a print. For instance, if you were making a T-Shirt with vinyl after coloring what I am about to teach, you would need five different iron-on colors.
To color inside an image in Cricut Design Space, you need to use a tool called "Contour." This tool will allow you to hide/show unwanted pieces from your projects, and it's located at the bottom of the Layers panel.
With the "Contour" tool, you can manipulate an image to reveal something that wasn't there before, like the blank spaces in the pizza.
If you are new to "Contour" and are confused about how to use it, make sure to read my how-to guide.


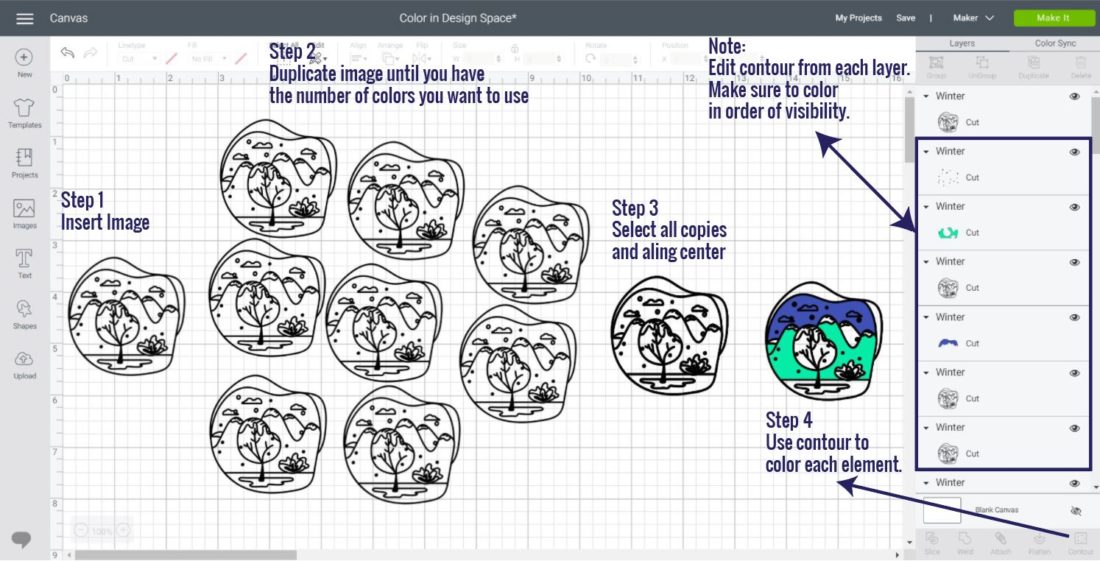
These are the steps you need to take to color inside the "Wanna Pizza Me" image.
Step 1 – Insert Image
Add the image you want to color to Cricut Design Space. Ideal images for this technique have blank spaces.
Step 2 – Make copies for each color
Duplicate or copy/paste image until you have the number of colors you want to use, plus another copy of the original image.
For this project, I used four different colors. Therefore I needed four identical copies.
Step 3 – Center images and use Contour
Select all copies and go to the top panel and click on Align and select the option, center.
With the contour tool, reveal the blank spaces and change the colors afterwards.
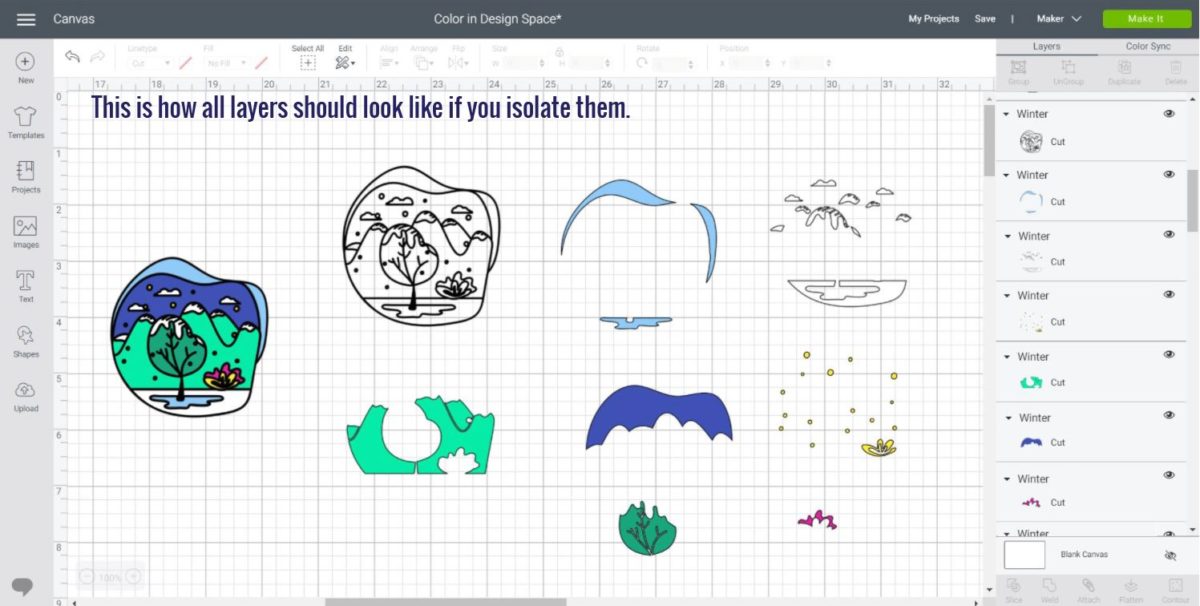
The best way to do this is by selecting each one of the images on the layers panel, taking into consideration the size and order of the pieces you want to color.
Most times, the original image always needs to be the first, or bottom layer on the layers panel. The original image (pizza in black color) will be the outline or border of your design.
This coloring is somewhat easy because all layers (pizza condiments) respect their space. Nonetheless, there are times where one layer can be covering the other one.
Check out the following example to see this in action.
This image is a cute little landscape and can be found in Cricut's library with the code MD77B2E8.
I followed the steps I mentioned before up until step 4.
When I used the contour tool, I decided to do some of the inside colors unbroken; this means that I didn't take into consideration the snow dots in the mountains or the stars in the sky.
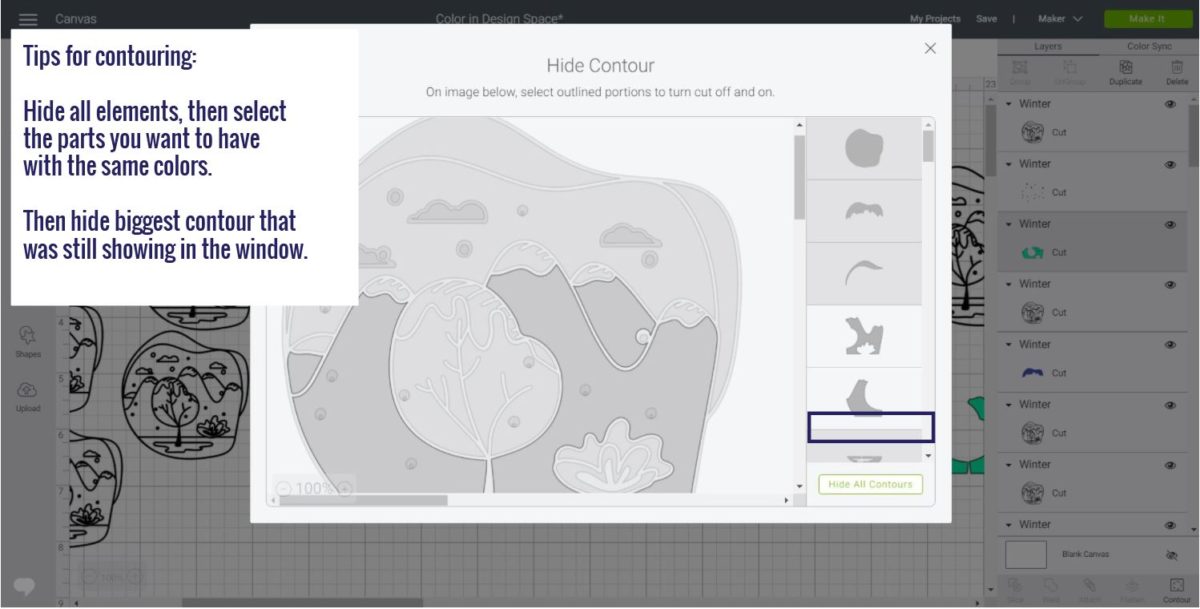
I usually recommend you take your time, but if your image is very intricate and you are using it for "Print then Cut," you can focus on the order of the layers instead.
For instance, the mountains need to be underneath the snow (small black dots) in the layers panel; otherwise, the snow would disappear.
The order of the layers doesn't matter if you are cutting vinyl or other types of materials, butif you are using Print then Cut and flattening the image,you need to make sure all the layers are in the correct order.
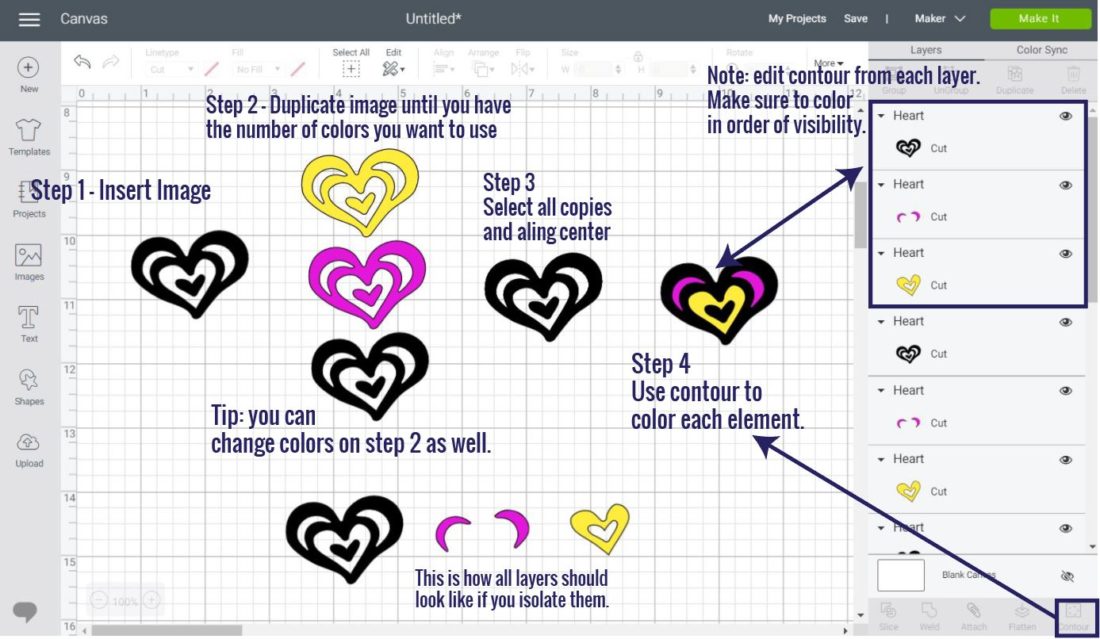
Here's our third and last example!
I followed the same steps, but this time I decided to change colors before I used the contour tool.
As you can see, there are many ways you can do something in Design Space. As you practice, you'll get faster and figure out better ways to accomplish the same task.
Don't ever think for a moment that everything comes easy to me!
Sometimes I get into fights with my Cricut too, that's why I like taking my time putting excellent content, so no one else faces the same problems I do.
What is Color Sync in Cricut Design Space
Another way to change colors in Cricut Design Space is by using "Color Sync."
This little feature doesn't get as much love as other tools like "Weld, Slice, Attach," etc. But let me tell you that once you know why it's for you won't stop using it.
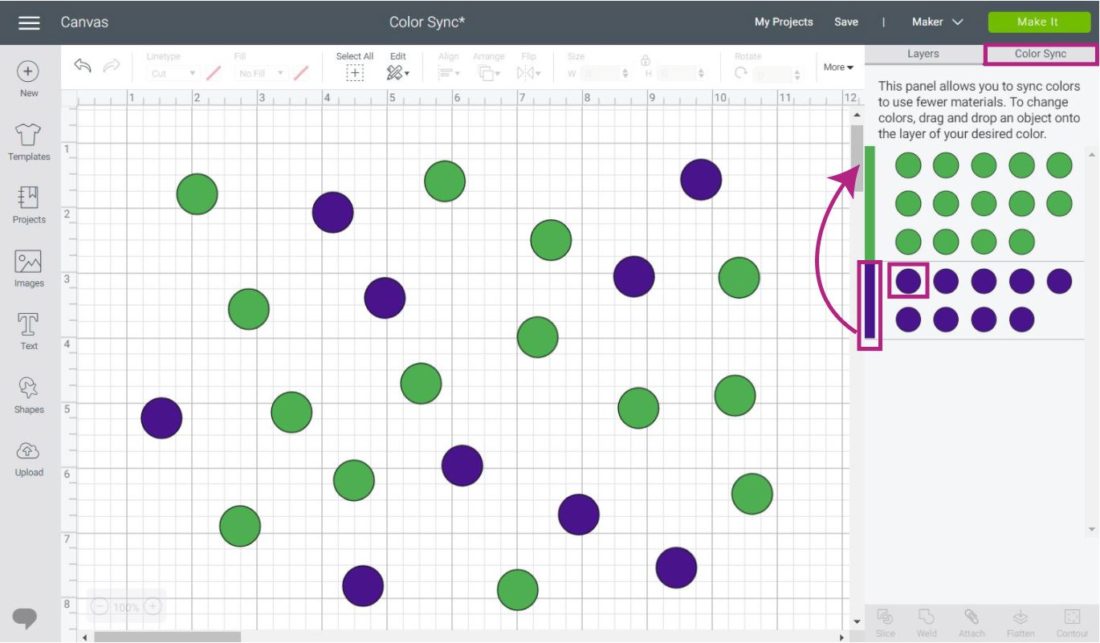
The Color Sync is located in the tab next to the layers panel.
When you click on it, all the layers (images, text, shapes) that have the same color will be grouped.
In this case, you only see circles, but if you have text, you will see a little initial of the word, and if you have an image, you will see a tiny icon that will represent it as well.
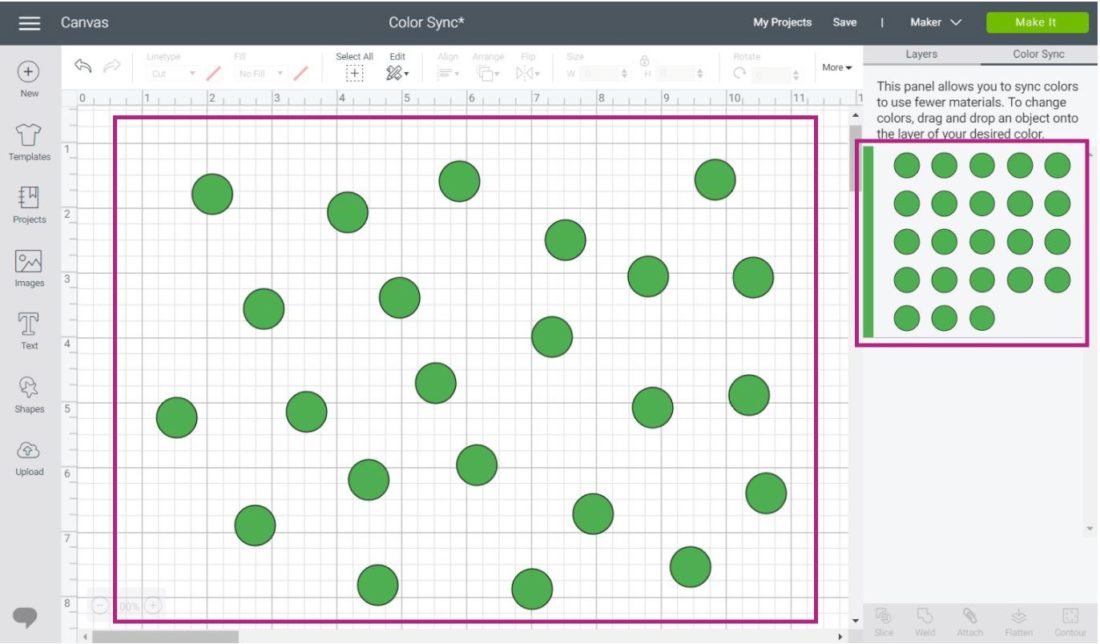
From the Color Sync panel, you can drag each layer to other colors, but what I like the most is that if you select the rectangle that represents each color and you drag it another color (green in this case), all the colors will change instantly!
Isn't that amazing?
The con with this technique is that if you have identical layers, you can't identify them one by one. But, if you want to change color in bulk, this tool will be your best friend.
What if the color you want to add or change it's not on the canvas?
Very simple.
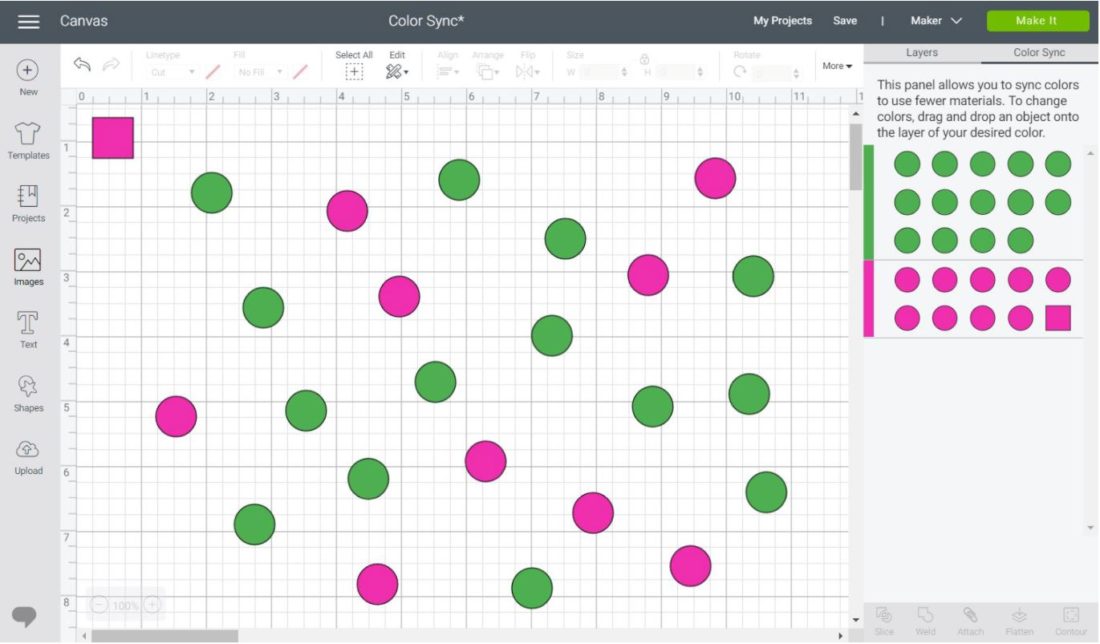
Add an element and change its color for the one you want to use and go back to Color Sync.
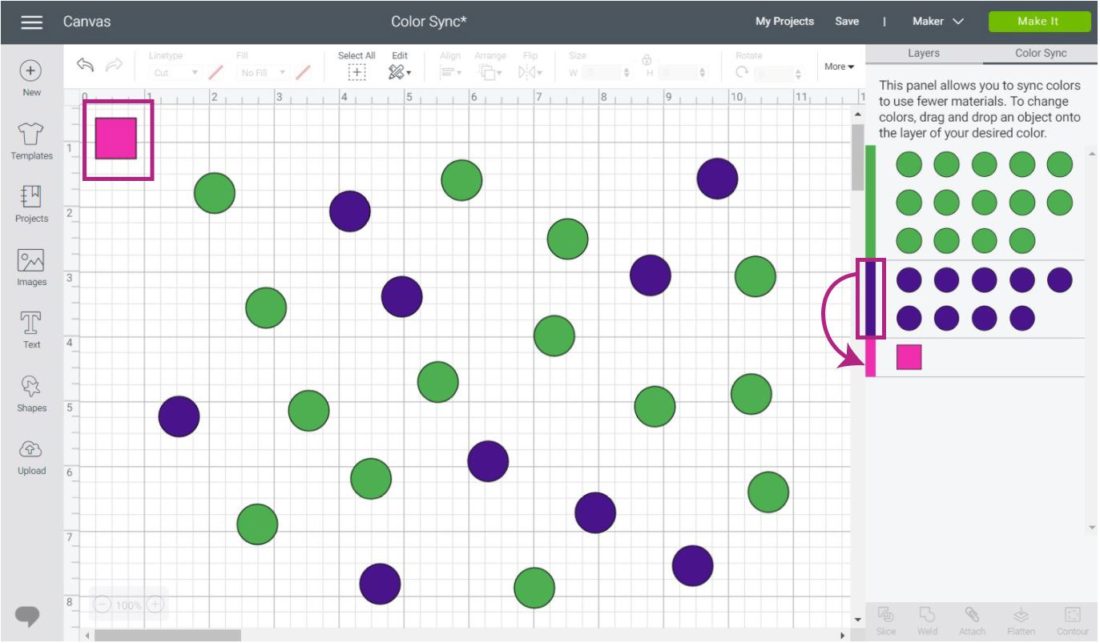
Now, select the colors you want to change and drag it to the new color.
Don't you think?
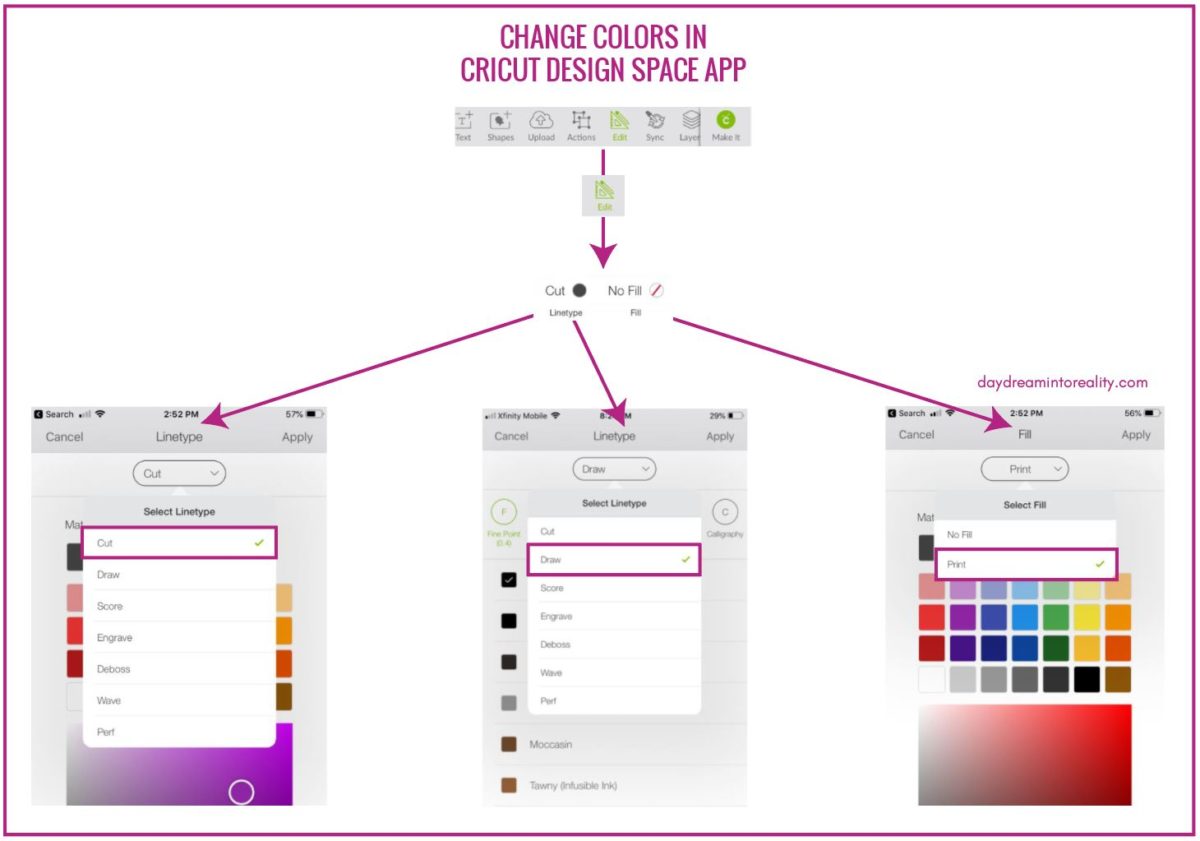
Changing Colors in Cricut Desing Space App
Most of the color tools and techniques I just explained throughout this tutorial can be applied from your iPad/Phone.
There are only two things that the app doesn't support:
- Using Patterns for Print then Cut
- Bulk editing colors with Color Sync. It can only be done with one layer at the time.
If you have a phone, here are some graphics that will help you to find all of the things I just taught you!
In Cricut's App, Linetype and Fill are in the Edit menu (bottom panel).
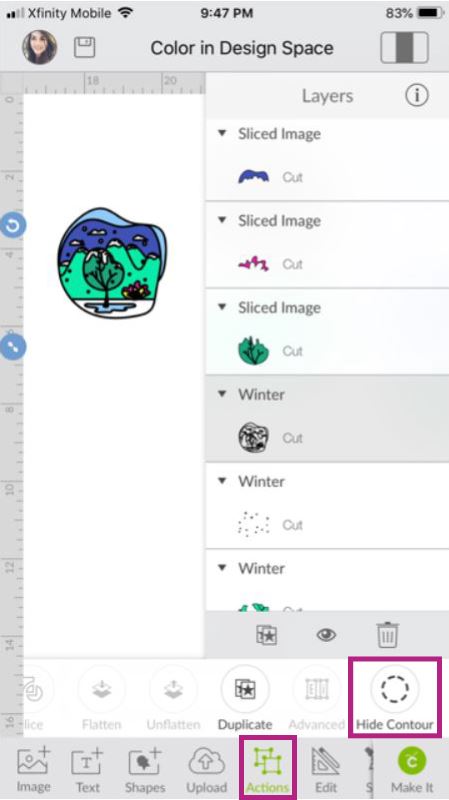
"Color Sync" is right by the "Edit" menu, and the contour tool for coloring an image in Design Space is located in the "Actions" menu.
-

-
- Source: @daydreamintoreality
How Do I Make a Cricut Design All One Color
Source: https://theprintvectors.com/blogs/news/how-to-use-and-change-colors-in-cricut-design-space
0 Response to "How Do I Make a Cricut Design All One Color"
Post a Comment